Shopify - Perform shipping costs test with Varify.io
In short
To find out at which shipping costs your products achieve the highest conversion or the best contribution margin, you can carry out shipping cost tests in Shopify. To do this, add an additional variant filter to the products to be tested. Assign a new shipping profile with the shipping costs to be tested to the respective variants.
The experiment remains invisible to users as the variant filter is not displayed in the store. A JavaScript code in the A/B test ensures that either the original shipping costs or the test shipping costs are displayed on the product detail page (PDP), depending on the variant.
To ensure that the correct shipping costs are also displayed on the category pages (collection pages) and the variant filter remains hidden, store the URLs of the products to be tested in the JavaScript code provided.
Why test shipping costs in Shopify?
Shipping cost tests in Shopify help you to find out which shipping cost level works best - i.e. which variant leads to more sales or higher turnover. Targeted A/B tests allow you to test different shipping costs at the same time without affecting the shopping experience. This allows you to make data-based decisions and optimize your store for greater success.
Step 1: Create new product variants
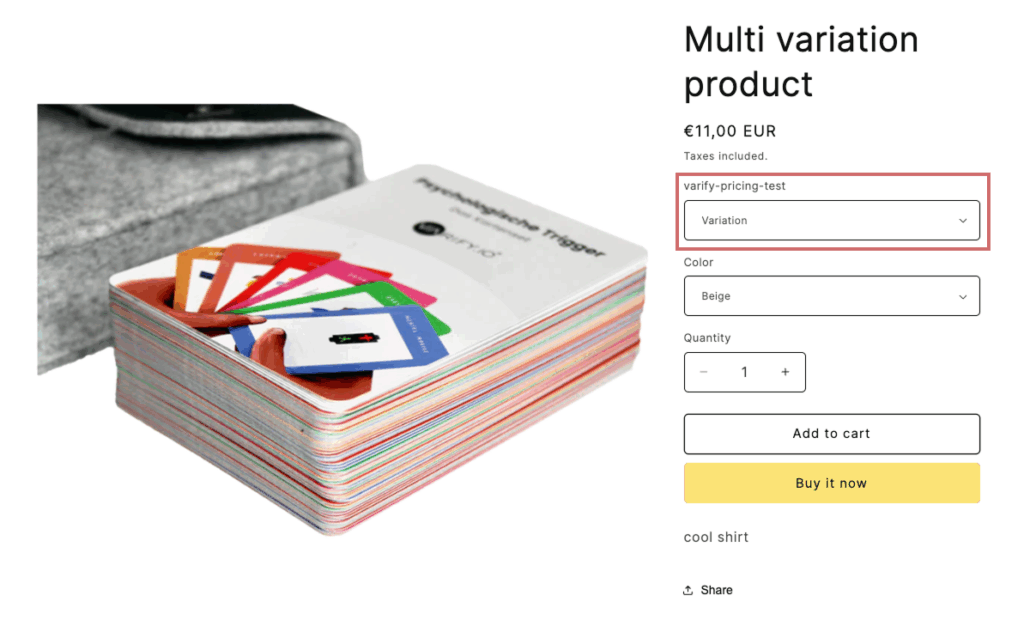
- Open the product in the Shopify backend for which you want to test the shipping costs.
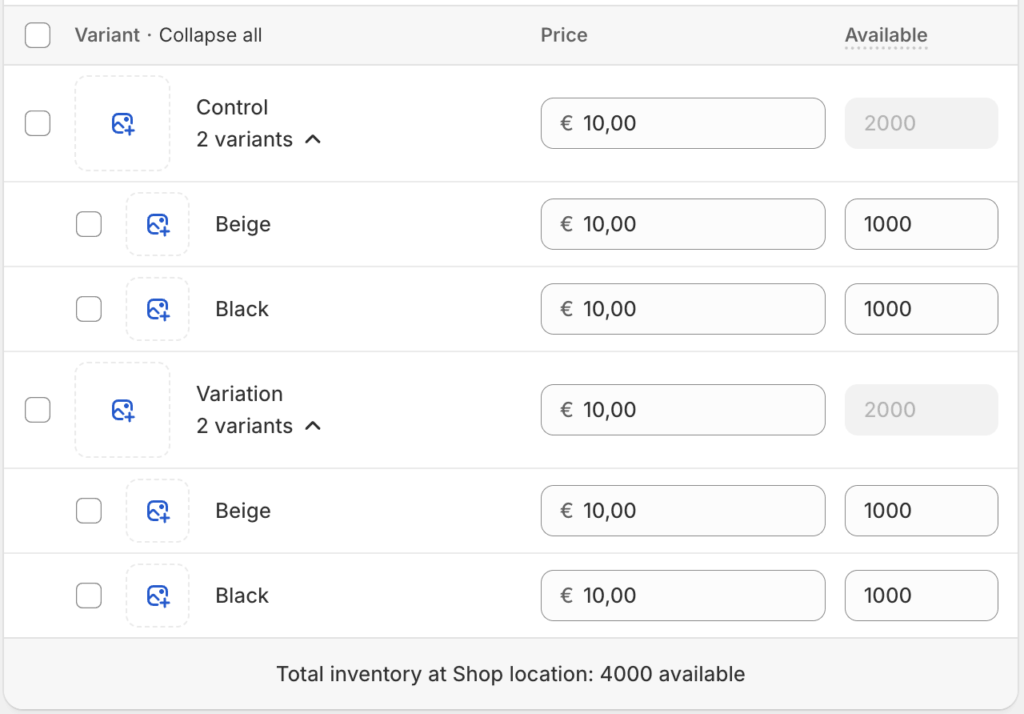
- Create a new variant with the "Option name" "varify-pricing-test".
- Create two "Option values" for this: "Control" and "Variation".
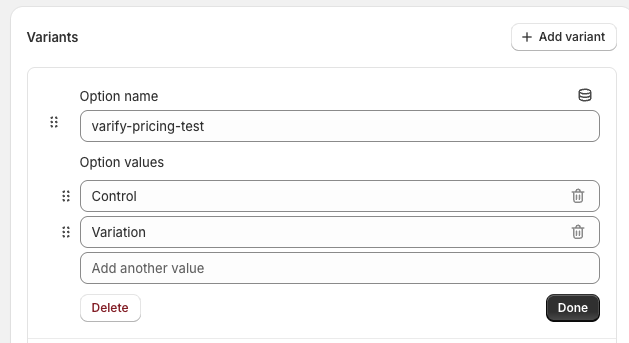
- If the product has other variants, such as a color filter, drag and drop the variant filter to the top so that it is positioned above the other filters. This is important for the test to work correctly.
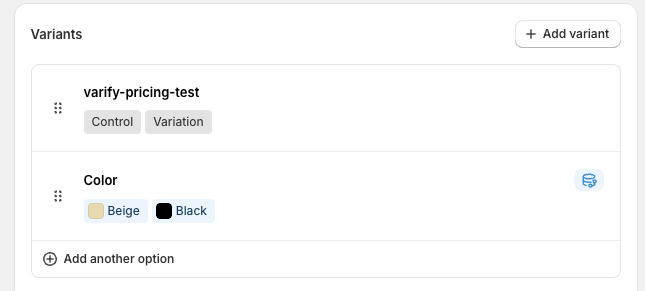
- Set the new price to be tested for each product variant in the "varify-pricing-test" price variant.
- Tip: Activate "Group by varify-pricing-test" to better manage the variants.
- If you have different variants or colors, you should also adjust the variant price here
- Also remember to adjust the available quantity so that the product is available in the store.
For example, if you have 1,000 units of the product in stock, you can set 500 units for the original price and 500 units for the new variant price.
Step 2: Create a new shipping profile
Next, we create a new shipping costs profile in which we define the amount of shipping costs to be tested for the product variant.
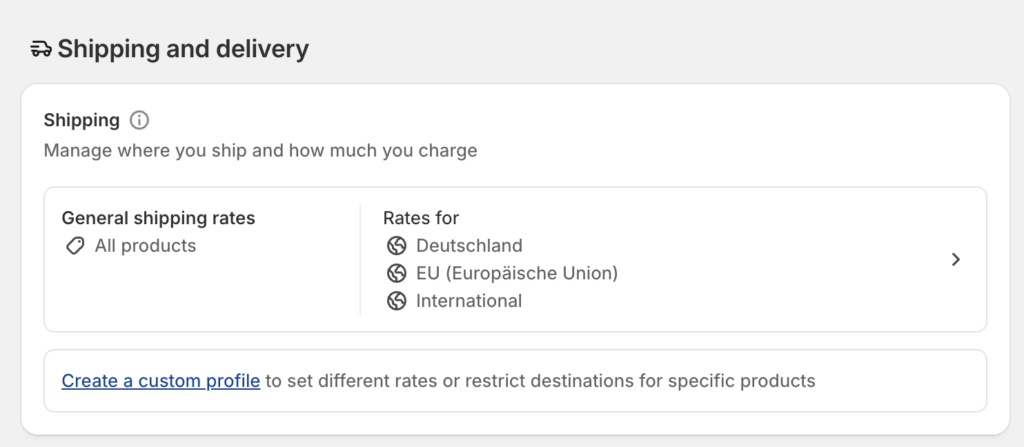
- Go to "Settings/Shipping and delivery"
- Click on "Create a custom profile"
- Give the profile a name, for example "Shipping cost experiment"
- Add the product variants that should receive the shipping costs to be tested
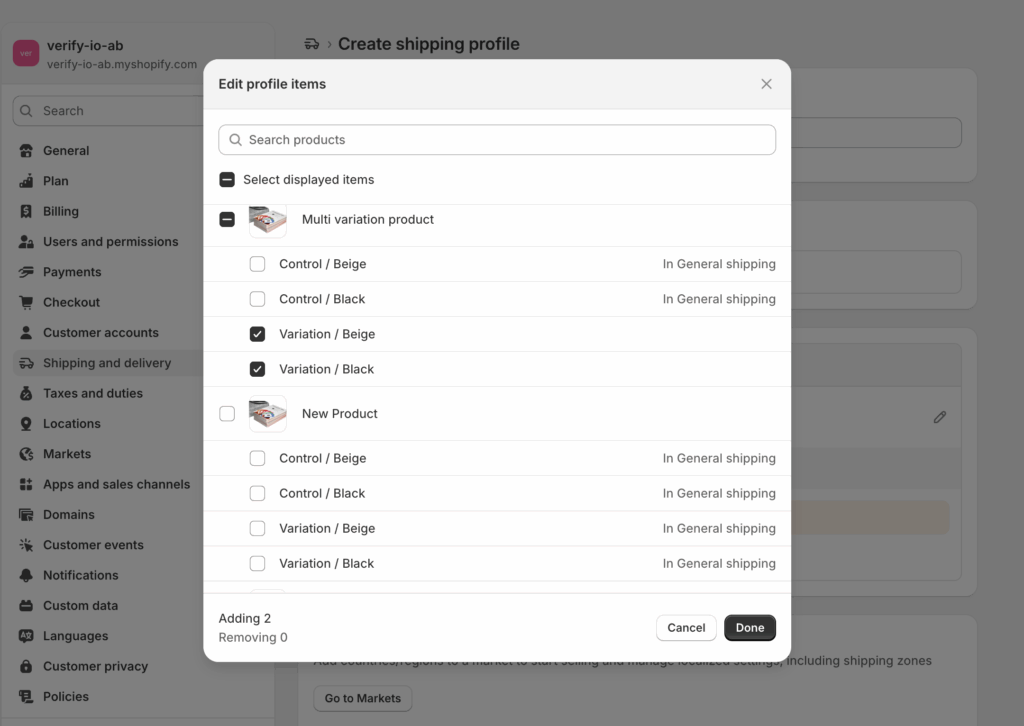
- Give the profile a name, for example "Shipping cost experiment"
- Add the product variants that should receive the shipping costs to be tested
- Now click on "Add shipping zone" and define the countries/zones to which the variants are to be sent. Here you should select the same zones that you generally ship to
- Click on "Add rate" and define the shipping costs to be tested
Step 3: Configure variant filter on the product detail page (PDP)
Variants Hide filter
- Open a product detail page (PDP) on which you have set up the variants for the shipping cost test and the experiment is to be carried out
- Open the developer tools (F12 or right-click > "Inspect").
- Use the inspection tool to select the newly created varify-pricing-test filter element so that it is completely highlighted - this will ensure that you have identified the correct selector.
- In this example, the first <div>-element in the <variant-selects>-element is selected. Depending on the template, the structure and HTML tags and classes may have different names.
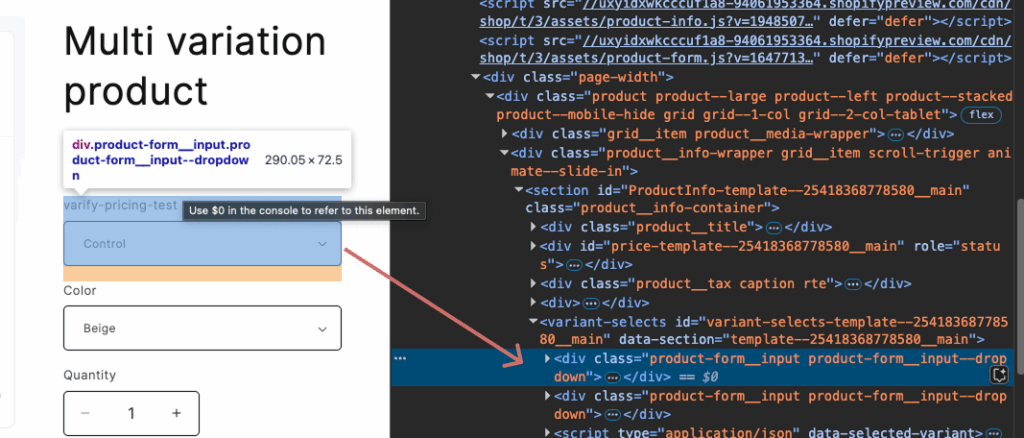
- Right-click at the highlighted position in the code and then select : Copy → Copy selector
This copies the exact CSS selector for the price filter.
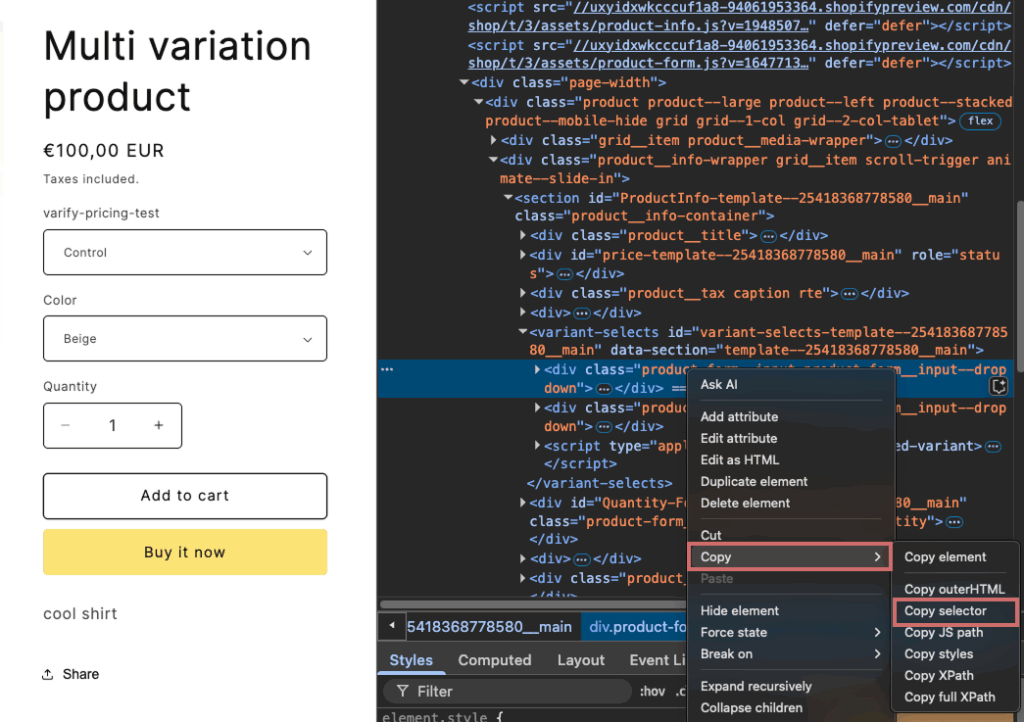
- It is best to save the copied selector in a document or a note - you will need it again soon.
Step 3: Customize code for the experiment
Create a new experiment via the Varify Dashboard. To do this, enter the store start page in the input field and click on "Create new Experiment". Below you will find the JavaScript code for the price test. Add this to the variant of your experiment using the "Add JS" function.
To ensure that the shipping costs experiment also works technically in your store, a few adjustments need to be made to the JavaScript code provided. Change the JavaScript in your variant as follows:
Line 1: Paste the copied CSS selector for the price filter into the quotation marks.
Line 2: Enter the class of the price - i.e. the element that is to change later.
Line 3: Specify the class of the product tile so that the code knows where the price is on the collection page.
From line 8: Add here all product URLs on which the shipping cost experiment is to be carried out. (If you are running the experiment for only one product, you only need to add one URL here and you can delete the other URLs). Make sure you keep the appropriate format of the URLs ('URL'). Add a comma after each 'URL' if there are more URLs after it.
JavaScript code for the price test
const varifyPriceFilterSelector = '#variant-selects-template--25418368778580__main > div:nth-child(1)';
const priceClass = 'price__regular';
const cardClass = 'grid__item';
const desiredVariantOption = 'Variation'; // Variation or Control

// Only URLs – variant IDs no longer required
const productURLs = [
    'https://demo-shop.com/products/article1',
    'https://demo-shop.com/products/article2',
    'https://demo-shop.com/products/article3'
];

const updatedHandles = new Set();

function hidePriceFilterOnMatchingProductPages() {
    const currentURL = window.location.href;
    const matchesProductPage = productURLs.some(url => currentURL.includes(url));

    if (matchesProductPage && varifyPriceFilterSelector) {
        const style = document.createElement('style');
        style.textContent = `
      ${varifyPriceFilterSelector} {
        display: none !important;
      }
    `;
        document.head.appendChild(style);
        console.log('Hiding price filter on matching product page:', varifyPriceFilterSelector);
    }
}

hidePriceFilterOnMatchingProductPages();

function formatPrice(priceInCents) {
    return (priceInCents / 100).toFixed(2);
}

function extractHandleFromHref(href) {
    const match = href.match(/\/products\/([^/?#]+)/);
    return match ? match[1] : null;
}

function extractHandlesFromURLs(urls) {
    return urls.map(extractHandleFromHref).filter(Boolean);
}

function updateProducts(retryCount = 0) {
    const productCards = document.querySelectorAll(`.${cardClass}`);
    const allowedHandles = extractHandlesFromURLs(productURLs);

    if (productCards.length === 0 && retryCount < 5) {
        console.warn(`No product cards found – retrying (${retryCount + 1}/5)`);
        setTimeout(() => updateProducts(retryCount + 1), 300);
        return;
    }

    allowedHandles.forEach((handle) => {
        if (updatedHandles.has(handle)) return;

        fetch(`/products/${handle}.js`)
            .then(response => response.json())
            .then(product => {
                const targetVariant = product.variants.find(v => v.option1 === desiredVariantOption);
                if (!targetVariant) {
                    console.warn(`No variant found with option1 === '${desiredVariantOption}' for "${handle}"`);
                    return;
                }

                let updated = false;

                productCards.forEach(card => {
                    const link = card.querySelector('a[href*="/products/"]');
                    if (!link) return;

                    const href = link.getAttribute('href');
                    const linkHandle = extractHandleFromHref(href);

                    if (linkHandle === handle) {
                        const priceElement = card.querySelector(`.${priceClass}`);
                        if (priceElement) {
                            const oldPrice = priceElement.textContent.trim();
                            const newPrice = formatPrice(targetVariant.price);
                            priceElement.textContent = `${newPrice}`;

                            console.log(`"${product.title}" – Price updated: ${oldPrice} → €${newPrice}`);
                        }

                        const imageElement = card.querySelector('.product-card-image img');
                        if (imageElement && targetVariant.featured_image) {
                            imageElement.src = targetVariant.featured_image.src;
                            console.log(`Image updated for "${product.title}".`);
                        }

                        // Update link with ?variant=...
                        const url = new URL(link.href, window.location.origin);
                        url.searchParams.set('variant', targetVariant.id);
                        link.href = url.toString();

                        updated = true;
                    }
                });

                if (updated) {
                    updatedHandles.add(handle);
                }
            })
            .catch(error => {
                console.error(`Error loading product "${handle}":`, error);
            });
    });
}

// Optional: Set filter selection on the PDP
function setPriceFilter() {
    const selectElement = document.querySelector(`${varifyPriceFilterSelector} select`);
    if (selectElement) {
        selectElement.value = desiredVariantOption;
        selectElement.dispatchEvent(new Event('input', { bubbles: true }));
        selectElement.dispatchEvent(new Event('change', { bubbles: true }));
    }
}

// Initial call after DOM ready
window.varify.helpers.onDomLoaded(() => {
    setPriceFilter();
    updateProducts();
});

// Optional: Repeat on DOM changes
window.varify.helpers.onDomChanged(() => {
    updateProducts();
});
Step 4: Save the new experiment
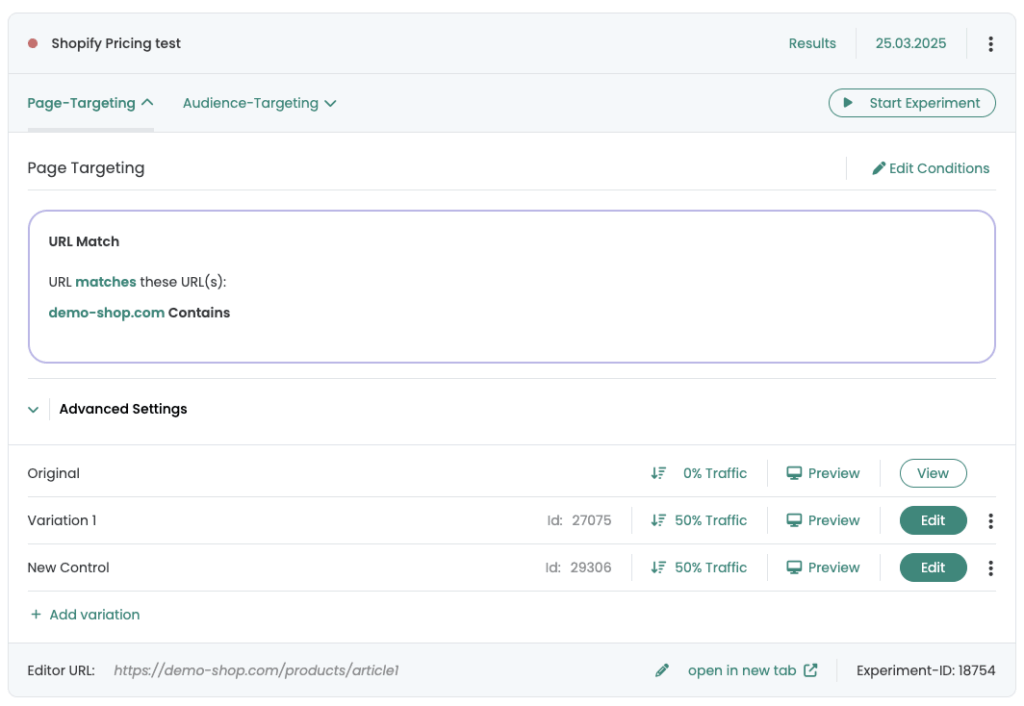
- Save the experiment and give it a name
- Duplicate the created variant in the newly created experiment and rename it to "New Original".
- Click on "Edit" to edit the "New Original".
- Open the JavaScript window and change the variable in line 4 from 'Variation' to 'Controll
- Save the changes.
- Set the split for the test to 50:50 between "Variation 1" and "New Control". "Original" gets 0 %.
- Customize the page targeting and set it to "Contains" with your store URL.
- Start the experiment.